Pixel Art on Minecraft Pixel Art on Minecraft Turtle
This tutorial gives you some bones guidelines for pixel fine art, and bear witness some examples of what you can brand with it.
Contents
- 1 Definition
- ii Designs in Minecraft
- ii.ane Blocks
- 2.1.1 Ocean lantern
- 2.one.two Stone
- 2.i.3 Obsidian
- 2.ane.four Block
- ii.1.v Pumpkin
- 2.one.six Glowstone
- 2.2 Mobs
- ii.2.one Zombie
- two.two.ii Creeper
- two.ii.3 Witch
- 2.ii.iv Iron golem
- ii.ane Blocks
- three Designs in existent life
- 3.1 Overview
- 3.2 Shapes
- iii.three Examples
- 3.3.i Piano
- 3.3.2 Creeper Face
- 4 Map Pixel Art
- v Videos
Definition [ ]
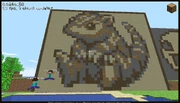
While pixel fine art is often colorful, highly-seasoned results tin can be accomplished fifty-fifty with a limited palette, as demonstrated past this pixel art portrait of the Pokémon Sandshrew.
Pixel art refers to a player using blocks to make certain figures from existent life or in Minecraft. These blocks are usually colorful blocks, such every bit wool or physical. Pixel art has no real purpose for survival, but it may be fun to bear witness your friends what all you tin can make using the express amount of the blocks in Minecraft. Life figures are often harder to brand, because of the fact that they are not made upward of blocks.
Designs in Minecraft [ ]
Designs drawn that are copied from Minecraft are unremarkably mobs or blocks, fatigued and so that a 1 pixel is equal to ane block. This makes pixel art that copies Minecraft textures 16 times bigger than the mob or block. To brand these fifty-fifty bigger, you can make i pixel equal to a 2 10 2 surface area of 4 blocks. For an absolutely giant version of a mob or block, brand 1 pixel equal to a 4 x 4 area of 16 blocks. There are an infinite amount of possibilities.
Blocks [ ]
Blocks tin be rather difficult to make with pixel art, because of the fact that some blocks employ many different colors for each pixel, but they are all similar. The reason this makes the pixel art difficult is that there may not be enough wool or concrete colors to simulate every pixel. If this happens, you can either try to figure out what colored block simulates each pixel the closest, or use blocks that are not wool, physical, or terracotta. Blocks that are not these colors ordinarily have many different colors within themselves, but from a distance, it looks equal.
Sea lantern [ ]
Bounding main lanterns are arguably one of the easiest blocks to brand with pixel art. Therefore, they're a cracking block to start off with. Merely make the outer edges of each face up with cyan wool or physical. Then, add cyan wool/physical in the corners of what you just made. For the rest of the next layer in, utilise light blue wool/concrete. One time once again, add light blue wool/concrete in the corners of what you lot just made. Finally, fill in the center of it with white wool/concrete. You are done.
Stone [ ]
The pixels in rock blocks are unlike shades of grayness. Making a stone block for pixel fine art should consist of grey wool or physical, low-cal gray wool or concrete, and rock itself. If you lot want an fifty-fifty bigger contrast, you can utilise white concrete for the lightest pixels in a stone block.
Obsidian [ ]
For the purples in an obsidian cake, employ a combination of a few of the following blocks: magenta wool or concrete, imperial wool or concrete, magenta terra cotta, and/or blue terracotta. For the black, utilise a combination of black terracotta and blackness wool or concrete. Use black wool or concrete for a more solid black colour.
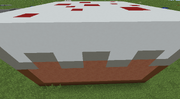
A cake made using pixel fine art, with its colors being virtually identical to what's existence described to the right.
Cake [ ]
Utilize red terracotta and brown wool/physical for the base of operations of the cake, or the bodily "block" function. For the top of the block, or the "icing" of the cake, use a combination of light gray and white wool/concrete. For the specks of red on top, which simulate "strawberries", use red wool or physical. If ane pixel is equal to 1 block, The block should be 8 blocks high, rather than 16 blocks, because a cake is a half-block in height.
Pumpkin [ ]
For nearly of the pumpkin, use a combination of at least 3 of the following: orange wool/concrete, brown wool/concrete, orange terracotta, light gray terracotta, and/or white terra cotta. For the "face", or front of the pumpkin, apply brown terracotta or chocolate-brown wool/concrete for the lighter parts, and grayness terracotta or black terracotta for the darker parts. The "stem", or the heart of the tiptop, should be made with green terracotta, xanthous terracotta, and yellow wool/physical.
Glowstone [ ]
For the dull background of the glowstone, utilize cyan or green terracotta. For the highlights, employ a combination of white wool/physical, yellowish wool/concrete, white terracotta, and yellow terracotta, and surround these highlights with brownish wool/concrete and gray terracotta. Do this on each of the 6 sides.
Mobs [ ]
Mobs have varying heights in Minecraft, depending on what mob it is. Similar blocks, they can be difficult to create, simply mostly, mobs have slightly more varying colors than blocks.
Zombie [ ]
A partially completed pixel art zombie made with physical and terra cotta, with a head and 1 arm missing.
The "feet" of the zombie should be made of gray wool or concrete. The legs should exist made up of purple wool/physical, with blue terracotta to highlight the "knees". The torso of the zombie should be made of lite blue wool or concrete, with cyan to highlight certain spots, and the arms should exist made of green and lime wool or concrete. Finally, the head of the zombie should be made with lime wool/physical and light-green wool/physical, or if desired, also include dark-green and lime terracotta, and white wool/concrete.
Creeper [ ]
Creepers are ugly in their colors, then use plenty of unlike colors when making a creeper with pixel art. Utilize lime wool/physical, light-green wool/concrete, white wool/concrete, and lite grey wool/physical for different parts of the creeper. If you want fifty-fifty more variations for colors similar to these, utilize the aforementioned colors only in terracotta for some parts of the creeper, so that you can have a slight contrast. Also, you may want to utilize blocks that are non wool, concrete, or terracotta, such as stone or slime blocks. The most important thing when making a creeper is to line the blocks up perfectly with the pixels on the creeper's face, as this is the nearly noticeable part.
Here is a simple instance for starters:
Witch [ ]
Witches are slightly easier to make than the mobs mentioned previously, every bit witches exercise not take quite every bit many colors in them. Their "feet" should exist made of light gray wool/concrete and yellow terracotta, and their "legs" should be made of light-green, lime, and purple wool/concrete. Their trunk should be made of mostly purple wool/concrete, with blue terracotta to highlight the center of it. Their face should be made with white terra cotta, with light gray terra cotta for highlights. Their eyes should be fabricated with majestic terracotta and white wool/concrete, their eyebrows black wool/concrete, and the area below their olfactory organ with orangish terracotta. Finally, their lid should exist fabricated of black wool/concrete, gray wool/concrete, green terracotta, lime wool/physical, and dark-green wool/physical.
See the following grid for an instance of how to make a witch's face up:
Iron golem [ ]
The bones layout of the iron golem is white with "rusted" parts that are more brown. For the white or light gray parts of the iron golem, use white wool/concrete and low-cal gray wool/physical. For the slightly "rusted" parts, use white terra cotta, light gray terracotta, and grey terracotta. White and grey terra cotta are really slightly browned, making them perfect for this circumstance. Use cerise and black wool/physical for the fe golem's eyes.
Fe golems have vine-like streaks of green running downwards their left side. These can be made with yellow, lime, and green wool/concrete. If yous want, you lot tin even mix in a little bit of lime terracotta or green terracotta, for some variation, or simply supervene upon the lime and green wool/physical with terracotta.
Designs in real life [ ]
Designs in existent life refer to taking objects that tin be found in the world, and building them in Minecraft using blocks. You can also build objects that don't exist in real life just do in movies.
Overview [ ]
When building something from real life, first you must decide what yous're going to build. Information technology's recommended to build something piece of cake, such as a box, before trying to build much more difficult things, such every bit a machine. If you're in survival mode, brand certain you have all of the necessary materials before starting to build. When in survival, information technology's strongly recommended to use primarily renewable materials for larger pixel fine art.
Once you know what you're going to build and you have the materials, yous need to make certain that what you are going to build in Minecraft is proportionate to what real life object you're basing information technology on. The easiest way to do this is by setting a legend for what a block equals. For example, yous may make up one's mind to take ane block equal 1 cubic centimeter (100:i calibration). For bigger objects (such as buildings) 1 cake may equal one cubic meter (bodily size), or perhaps for behemothic objects (such as the world) a cubic kilometer. Information technology all depends on the size of the object, and how detailed you want it to be.
Something that is fun to do one time you have completed your pixel art projection, is to brand a pigsty to go inside of it. If you want, you lot can even turn the within into a parkour course, a maze, a house, or a mine. If you lot're advanced with redstone, yous may want to add some to the inside of the pixel fine art. There are many possibilities - it's up to you to determine which ane to use.
Shapes [ ]
When building advanced pixel fine art from existent life that contains anything other than squares and rectangles, you must know how to build shapes that may be difficult to brand in Minecraft. These include circles, triangles, spheres, and more. If new to edifice shapes, start off past breaking 3-dimensional shapes downwards into 2-dimensional, and combining the two-dimensional back together. To acquire more than almost how to build shapes, meet Tutorials/Creating shapes.
Examples [ ]
![]()
This section is a work in progress.
Please help in the expansion or cosmos of this commodity by expanding or improving it. The talk page may contain suggestions.
Here are some examples of real life objects you can simulate in Minecraft through pixel art.
Piano [ ]
A piano is one of the more simple real-life objects to build in Minecraft equally pixel art, as it is mostly fabricated upwards of squares rather than round shapes. The coloring is also pretty unproblematic, y'all just need black and white wool or concrete. Hither is an example of how 1 third may look on a piano.
Creeper Face [ ]
Minecraft'southward iconic mob tin can hands be made out of green and black wool
Always recall, the bigger you brand something in pixel fine art (especially for existent-life designs), the more precise it looks.
Map Pixel Art [ ]
It is possible to make pixel art using a map. You lot do this by finding a suitable surface area, preferably 1 with few obstructions, and using a map. Find an appropriate area on the map to begin building, and commencement by laying down blocks in the pattern of any yous are trying to create, exist it a role player, an item, a mob or anything you'd like to build. When you're done, you can bank check the map again. On it, there should be whatever image you tried to create.
If you lot want to, y'all tin can lay down a canvas of solid blocks behind or around the picture show to utilise as a background, simply be enlightened that doing this creates a tremendous shadow beneath the picture. It may as well be a good thought to accept your picture take a large portion of the heart of the map, and then in that location isn't likewise much whitespace, since that would be a waste material. You can even create a pixel-fine art frame to become around information technology! Locking the map has the reward that the pixel art need not be in place in order to announced on the map.
If you're creating some kind of map (the playable kind, not the item), preferably an clandestine or indoor 1, yous can utilise colored blocks to create a "minimap", which is a small map that appears equally role of the HUD in some games. Yous do this by putting a solid-color layer over the peak of the area, and tracing the cave's layout using a different block over the peak of the solid colour layer. Y'all can create labels, other pieces of pixel art and/or different colored blocks to mark certain areas on the minimap. Finally, when the layout is all done, requite the player a used map (this time the particular kind) to concur in their off-manus slot to use as a minimap as they explore the dark caves or wherever you lot set the area in. If yous want to accept the minimap as an actual feature rather than just a map item, you can get a modernistic or plugin to put a minimap on the HUD, but be aware that the player may not have the mod installed when they play the map if they aren't playing on a server with the mod preinstalled.
Videos [ ]
The following video is a pixel-art creeper in Minecraft. Annotation that this creeper is a three-dimensional pixel fine art creation, pregnant that it has depth, width, and height.
This video is a timelapse of Harley Quinn (Suicide Squad) being created in Minecraft using 2-dimensional pixel art.
The adjacent video is a tutorial on a relatively easy mode to brand "The Wink" with pixel art in the original Mega Man fashion. This ane, like the previous, is two-dimensional.
Source: https://minecraft.fandom.com/wiki/Tutorials/Pixel_art
Post a Comment for "Pixel Art on Minecraft Pixel Art on Minecraft Turtle"