How to Open Upload Rainforest Infusions Bottle
Hither are your best tips and techniques on how to kickoff an 4. Nurses who would want to master this essential nursing skill.Intravenous (Four) insertion may exist one of the basics skills a nurse would acquire, but it could be one of the almost difficult to master if you lack the exercise and the confidence to practise information technology. Most of the sharpshooters have gained their skill through continuous practice and plenty of experiences in this field.
A lot of factors may affect the way y'all insert an intravenous catheter, but you have to command them and curve them to your convenience. Never rush on any nursing skills that yous still not have, or take a shortcut just to accomplish your goals. Along with these intravenous therapy tips, nursing practices must be authentic, precise, and learned non simply by the brain but nearly especially by the eye.
IV Therapy Tips for Starters
Preliminary IV therapy tips and tricks on how to start an IV:
1. Stay calm and be prepared. Striking the bullseye on one try will depend on the nurse'southward preparation and skill. Yous and your patient should be composed as a nervous and rushed procedure volition likely result in failure. Allay anxiety past explaining the procedure to the patient and determine the patient'due south history with Four therapy. Ensure the patient is comfy and sufficiently warm to preclude vasoconstriction.
two. Exude confidence. Believe in yourself and reassure the patient you know what you're doing. The patient will be encouraged by your conviction and you also, of course.
3. Assess for needle phobia. Needle phobia is a response as a result of previous IV insertions. Symptoms include tachycardia and hypertension before insertion. On insertion bradycardia and a drop in claret force per unit area occurs with signs and symptoms of pallor, diaphoresis, and syncope. Reassure the patient with a soothing tone, educating the patient, keeping needles out of sight until the last minute before use, and use of topical anesthetics can aid manage needle phobia.
4. Notice Infection command measures. Use gloves in inserting a cannula into the patient. Intravenous insertion is an invasive procedure and requires aseptic technique and proper infection control measures. Wipe a cotton swab or alcohol pad on the insertion site to minimize microorganisms in the surface area and also to visualize the chosen vein more than clearly.
five. Appraise the vein. Before inserting a needle into a patient'south vein, yous have to assess its status first. A well-hydrated person has firm, supple, and easy-to-achieve veins. Well-hydrated veins are boisterous, making them the right fit for insertion. Some patients need intravenous therapy but are dehydrated, and so it is a challenge to hit the vein in one go. To avoid injuring the vein, always assess kickoff that you are aiming for a vein that is non delicate enough to blow up during the insertion. Take your fourth dimension. The following tips can assist you with that.
6. Feel rather than look. If y'all can't run into a suitable vein, trust your fingers even more than your eyes. It'southward likewise an excellent opportunity to familiarize yourself with a suitable vein. A tendon may feel like a vein simply palpating information technology through a range of motion may bear witness that it is not.
vii. Ask your patient. The patient may know more which veins are suitable based on his previous IV history.
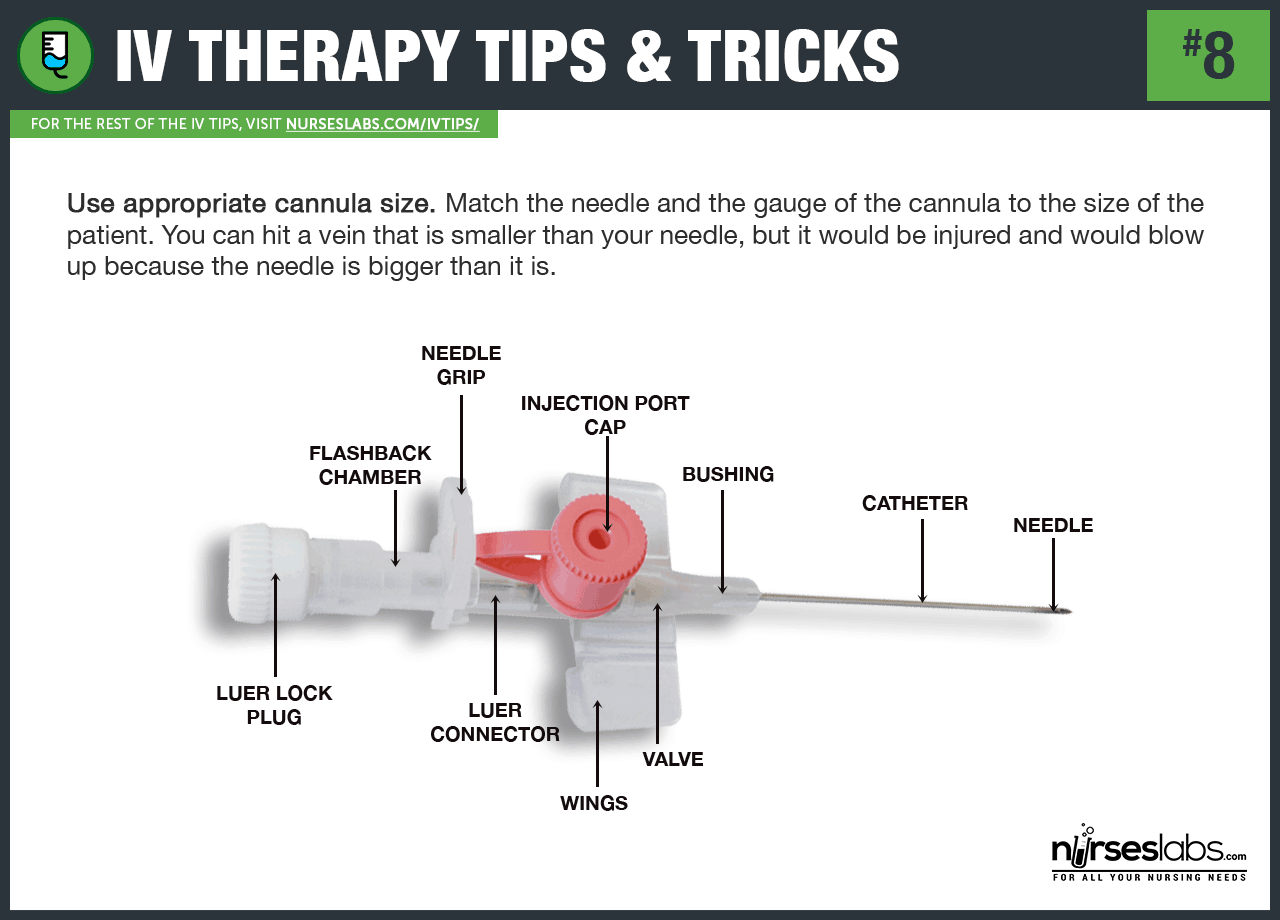
8. Use an appropriate cannula size. Match the needle and the gauge of the cannula to the size of the patient. The guess refers to the diameter of the lumen of the needle or cannula — the smaller the gauge number, the larger the bore of the lumen, the larger the gauge number, the smaller the diameter of the lumen. You can hitting a vein that is smaller than your needle, but it would be injured and would blow up because the needle is bigger than it is.
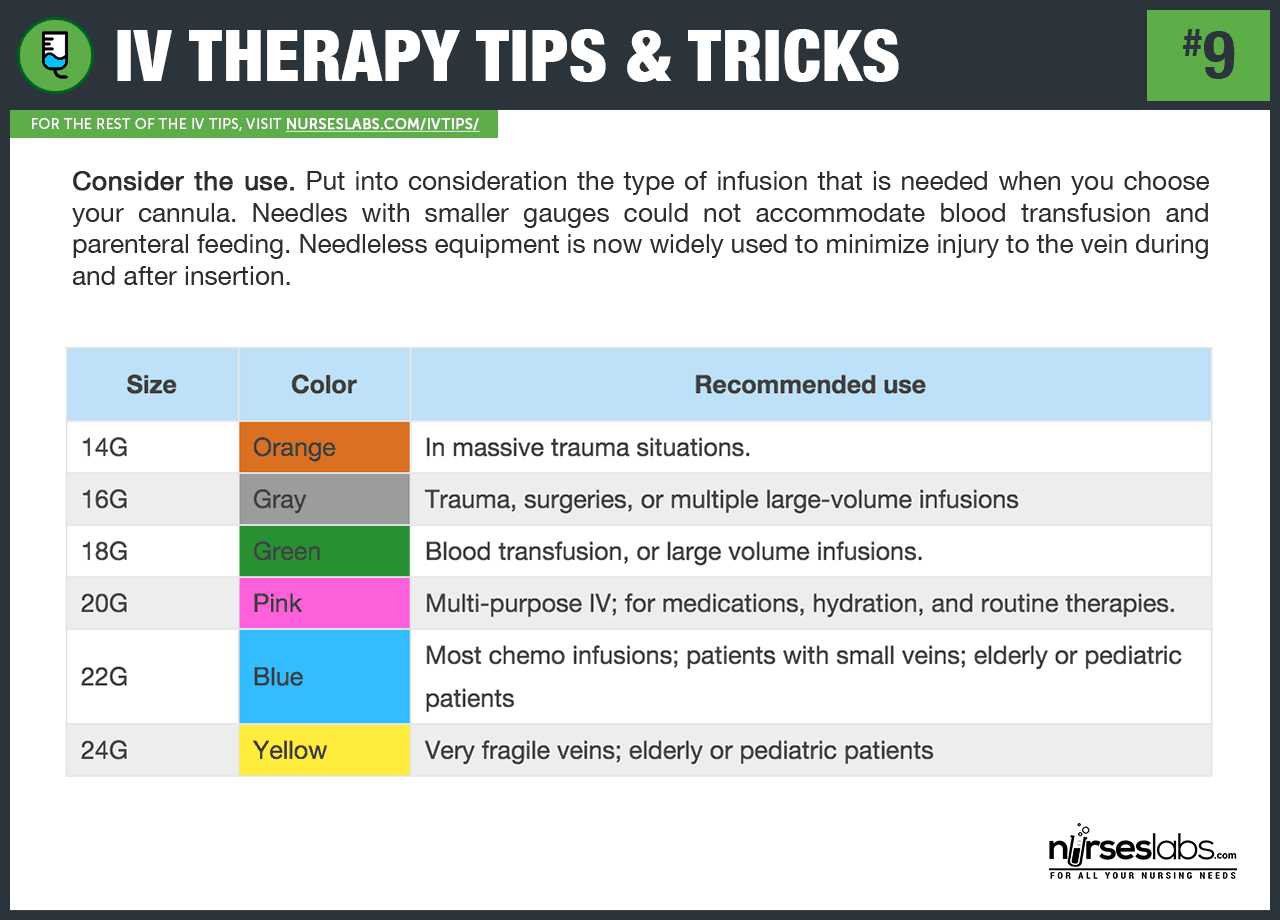
9. Consider the use. Put into consideration the type of infusion that is needed when you choose your cannula. Needles with smaller gauges could not adapt blood transfusion and parenteral feeding. Large-diameter lumens allow a higher fluid rate than a smaller diameter, allowing the administration of higher concentration of solution or medication. Needleless equipment is now widely used to minimize injury to the vein during and after insertion.
10. Insert at the non-dominant hand commencement. Consider inserting on non-dominant mitt first so the patient tin can still perform simple functions using the ascendant hand. However, if you lot cannot locate an appropriate site or vein for insertion on the non-dominant mitt, continue with the ascendant paw.
Vein Selection for Starting an IV
In this section, the following Iv therapy tips and tricks are about selecting the best vein sites for venipuncture.
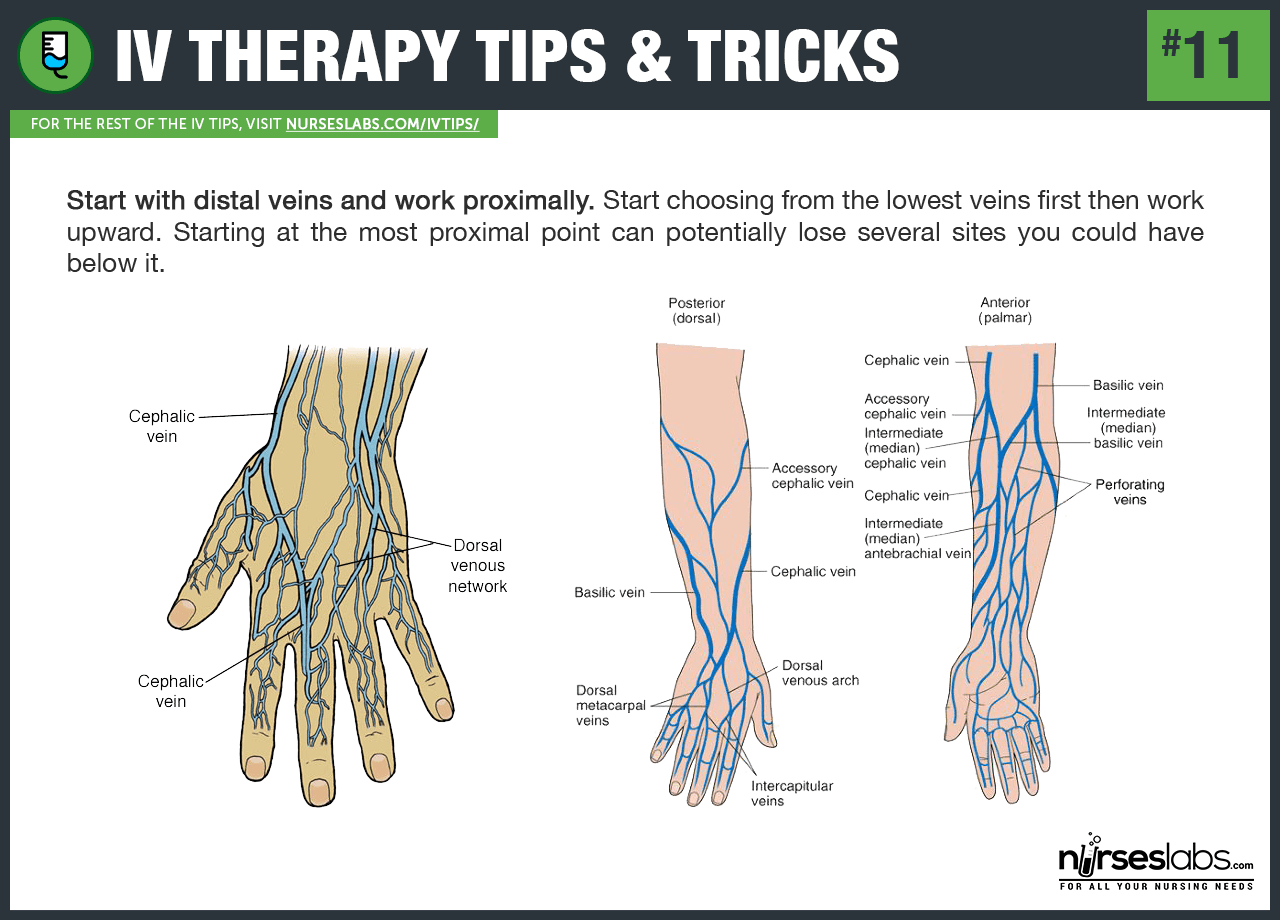
11. Commencement with distal veins and work proximally. Start choosing from the lowest veins first and so work upward. Starting at the most proximal betoken can potentially lose several sites you could have below information technology.
12. Use a BP cuff rather than a tourniquet. If the patient has low BP, information technology would be best to utilise a BP cuff inflated to advisable pressure to make the veins dilate. This technique can besides be useful for older patients and those with veins that are as well hard to access. For patients with hypovolemia, use a larger vein every bit small veins plummet quicker. Inflate the cuff to the everyman pressure first and see if the veins appear. When using one every bit a tourniquet, invert it, then the tubings are away from the limb giving you a clear view of the site and removing possibilities of the tubings contaminating the site. The BP cuff lets your patient have a wider, more comfortable tourniquet that compresses evenly and efficiently and can be adjusted to the exact pressure needed to amplify the veins.
13. Apply the tourniquet correctly.The tourniquet should be placed tightly enough to hinder venous menses, but not too tight to impede arterial flow — that way, claret continuously flows into the extremity, merely it meets resistance as it tries to leave, thus distending the veins. Apply the tourniquet snugly, about twenty to 25 cm in a higher place the needle insertion site. Feel for the radial pulse with the tourniquet in identify, if you can't palpate it, your tourniquet is likewise tight.
xiv. Puncture without a tourniquet. If the patient has adequately filled but fragile veins, proceed with the insertion without using a tourniquet. Pressure from the placement of the tourniquet may cause the customer's frail vein to accident out upon puncture.
Making the Vein More Visible
Now that vein selection is consummate, the following tips and tricks for starting an IV are on how to make the vein more than visible.
15. Gravity is your friend. Let the patient's arm dangle down on the side of the bed if no veins are observed to promote venous filling. Gravity slows venous return and distends the veins. Full and distended veins are easier to palpate and are ever an fantabulous selection for insertion.
16. Use warm compress. Utilize warm, moist shrink or warm towels over the area for several minutes before you insert and, of form, before you cleanse. Exit the compress in place for x to xx minutes. A warmer temperature would enable the vein to dilate and make it more visible to the surface.
17. Do not slap the vein. Some nurses have a bad habit of slapping the site of insertion and so that the vein be more visible. Though the practise is helpful at times, veins take nerve endings that react to painful stimuli causing them to contract, therefore, making it harder to locate the vein. Delight don't make an already painful procedure fifty-fifty more than painful.
eighteen. Flick or tap the vein.Rather than slapping, use your pollex and 2d finger to moving-picture show the vein; this releases histamines beneath the skin and causes vein dilation.
19. Feel the vein. Wrap a tourniquet above the site of insertion to dilate the veins and gently palpate the vein by pressing it upwardly and downwardly. Utilise the same fingers in palpation so you would be able to familiarize the feeling of a bouncy vein. Tap the vein gently; do not slap it to avoid contraction of the vein.
twenty. Fist clenching. Instruct the patient to clamp and unclench his or her fist to shrink distal veins and distend them; this helps in the venous filling.
21. Employ the multiple-tourniquet technique. By using ii or iii latex tourniquets, use i high on the arm and leave for 2 minutes, utilise the second at mid-arm below antecubital fossa. Collateral veins should appear. Apply the 3rd ane if needed.
22. Vein dilation using nitroglycerine. To help dilate a modest vein, utilize nitroglycerine ointment to the site for i to two minutes. Remove the ointment as yous brand your final disinfection of the site with alcohol.
23. Flow where yous desire information technology to go. When disinfecting the insertion site, rub the alcohol pad in the direction of the venous flow as to improve the filling of the vein by pushing the claret past the valves.

24. Clean vigorously and widely. To have the tape and dressing attach tightly to clean dry out skin. Disinfect a wider surface area to in case another vein shows up.
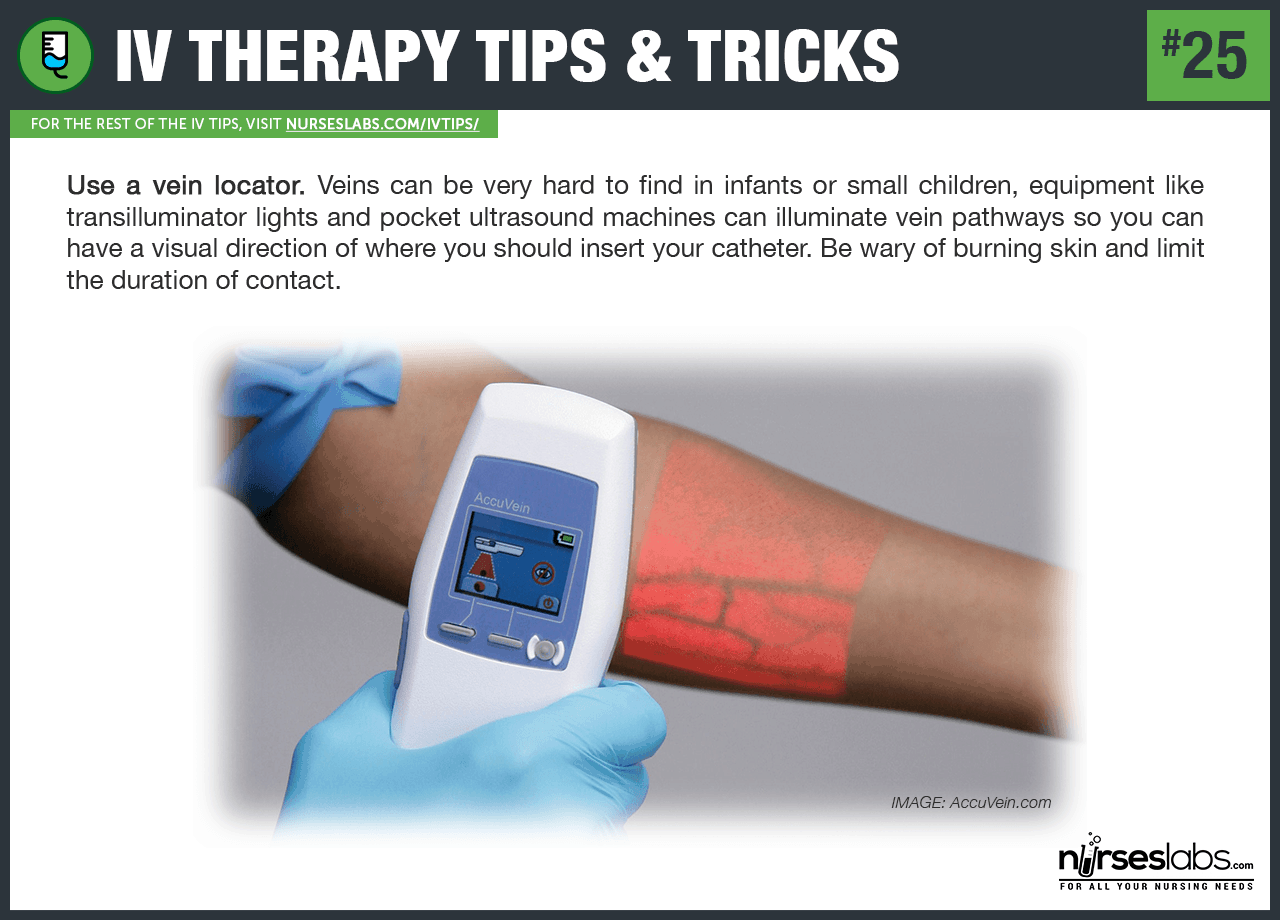
25. Use a vein locator. Veins can be very difficult to find in infants or small children, equipment similar transilluminator lights and pocket ultrasound machines can illuminate vein pathways then you tin can have a visual direction of where you lot should insert your catheter. Be wary of burning pare and limit the duration of contact.
Insertion of the Intravenous (Iv) Catheter
For the post-obit Four start tips, you'll demand to give your total attention as this section of the guide is about how to insert the catheter correctly and troubleshooting techniques if you fail to hit it the first time.
26. Stabilize the vein. Pull the pare taut but beneath the entry site to back up the vein for needle entry and this likewise lessens the pain the patient may feel upon insertion. Make sure that the alcohol has already dried on the skin before inserting considering this may get more than painful for the patient.
27. Insert the IV catheter directly atop the vein. Initiating venipuncture from the side of the vein tin push information technology sideways even if it'southward anchored past your hand.
28. Prevent kinking. Sometimes, if the vein is hardened or scarred, at that place is a gamble of kinking the cannula. Otherwise, i can get through the scar to a usable portion of the vein by using the following technique:
29. Twirl the catheter hub. Mild obstructions, tortuosity of the vessel, vessel fragility, and frictional resistance can be overcome past "twirling" the catheter hub. To practise this insert the Iv with a slight rotating motion to assist glide over some parts of the vein.
xxx. Bevel up.Brand sure the bevel of the needle faces up as this is the sharpest function of the needle. Believe me; the needle volition glide hands if inserted this way.
31. Make the shot at a fifteen-thirty caste bending over the skin. Agree the catheter in a 15-30 degree angle over the skin with the bevel up and inform the patient that you are going to insert the needle.
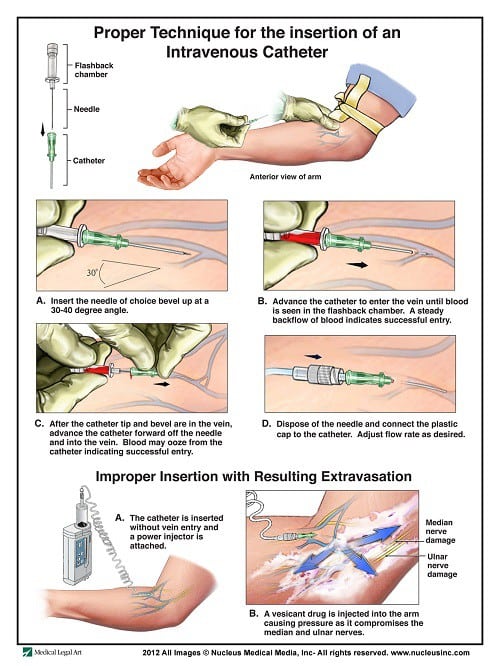
32. Feel for whatever resistance. As you insert the needle, feel whatsoever resistance from the pain. If no resistance is felt, advance the needle carefully. If at that place is resistance felt, discontinue your insertion because you might disrupt the vein and injure information technology further.
33. "The Flashback." One time you tin see that there is a backflow of claret (i.eastward., "Flashback") from the veins, remove the tourniquet and completely accelerate the catheter and remove the needle altogether. Secure the catheter to the patient's skin correctly and open up the infusion line to kickoff the therapy. It's ane of the best feelings in nursing!

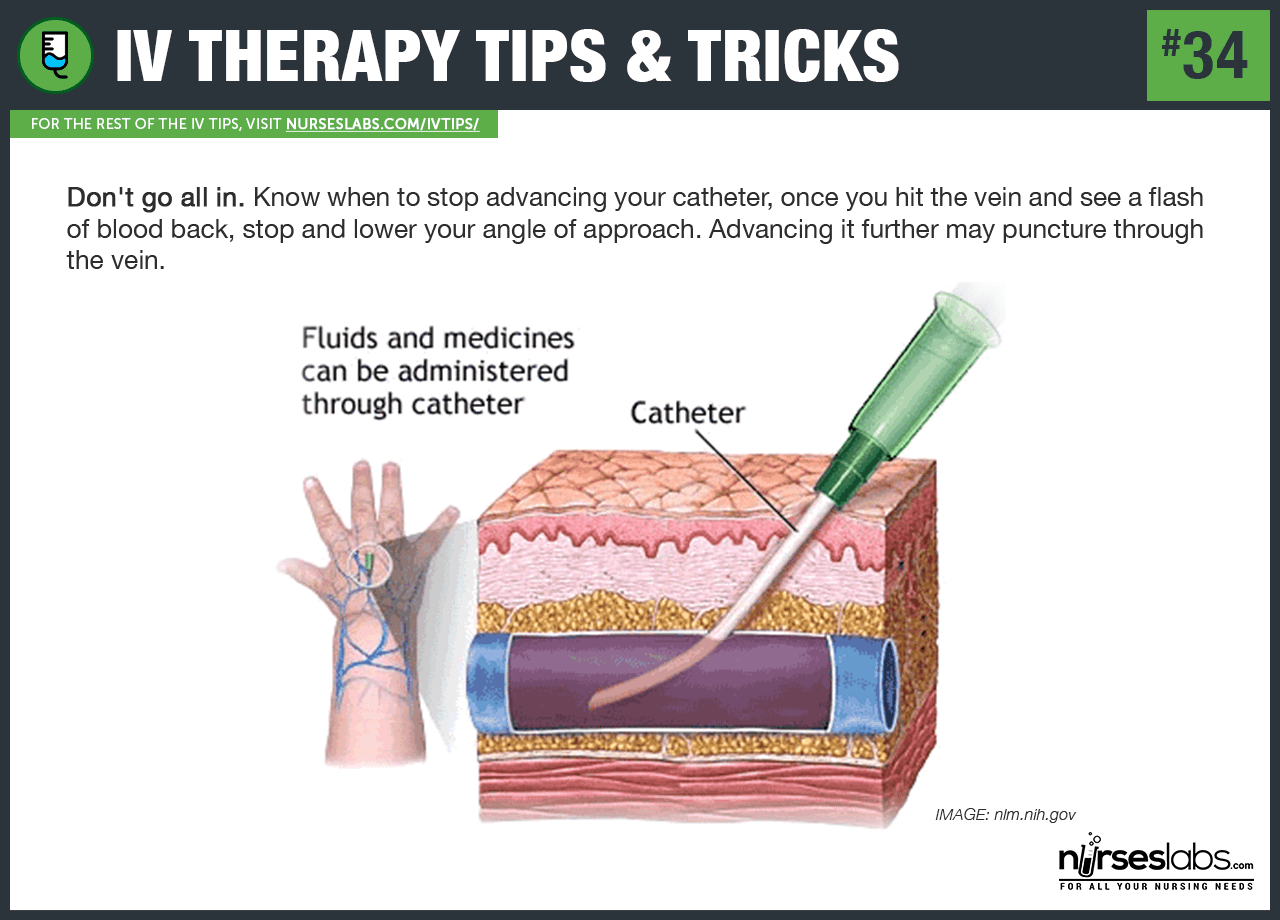
34. Don't go all in. Know when to stop advancing your catheter, once y'all hit the vein and see a wink of blood back, stop and lower your angle of approach. Advancing it further may puncture through the vein!
35. Don't rush into starting the IV fluid. Once inserted and secured, initiate the 4 infusion slowly as if you're working with fragile veins. Rushing to start the fluid might blow the vein.
36. Release the tourniquet first. Once y'all have ensured the catheter is within the vein, untie the tourniquet before advancing the catheter to prevent information technology from bravado due to increment in pressure.
Securing the 4 Line
If you accept successfully inserted the catheter using the IV therapy tips above, you demand to make sure it lasts by securing it, here are the tips:
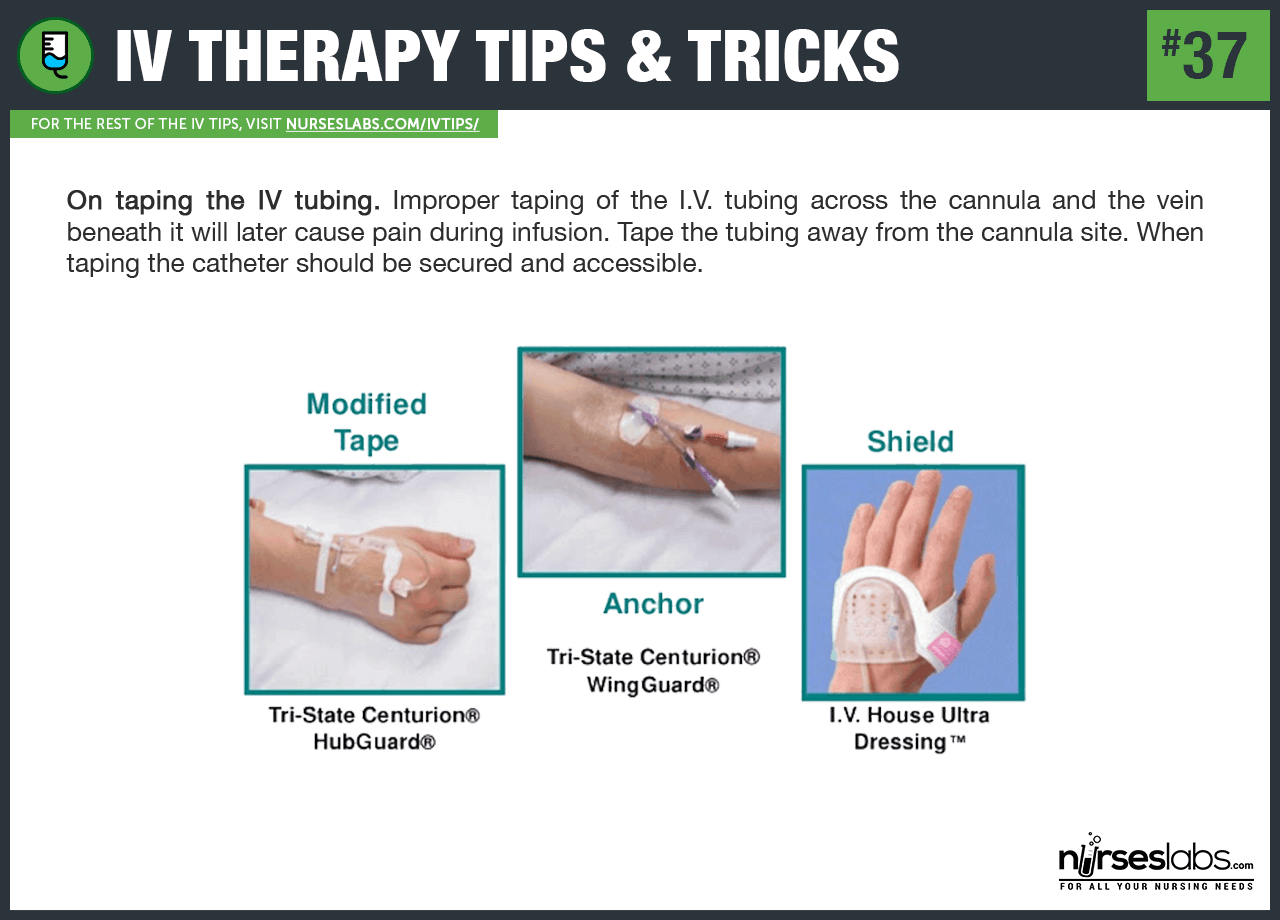
37. On taping the Iv tubing. Improper taping of the I.V. tubing across the cannula and the vein below it will later cause pain during infusion. Record the tubing away from the cannula site. When taping the catheter should exist secured and accessible.
38. Limbs in motion?When the patient's limbs are on the move (i.eastward., inside an ambulance), secure the IV site by locking the arm in extension and blocking the flexion at the elbow.
39. Go with the flow when taping. Record downwardly the tubing while because the natural movements of the body; thus running all tubing laterally on the limb in the direction of the motion. You can prevent the tubing from coiling or tangling by "going with the flow" of the body.
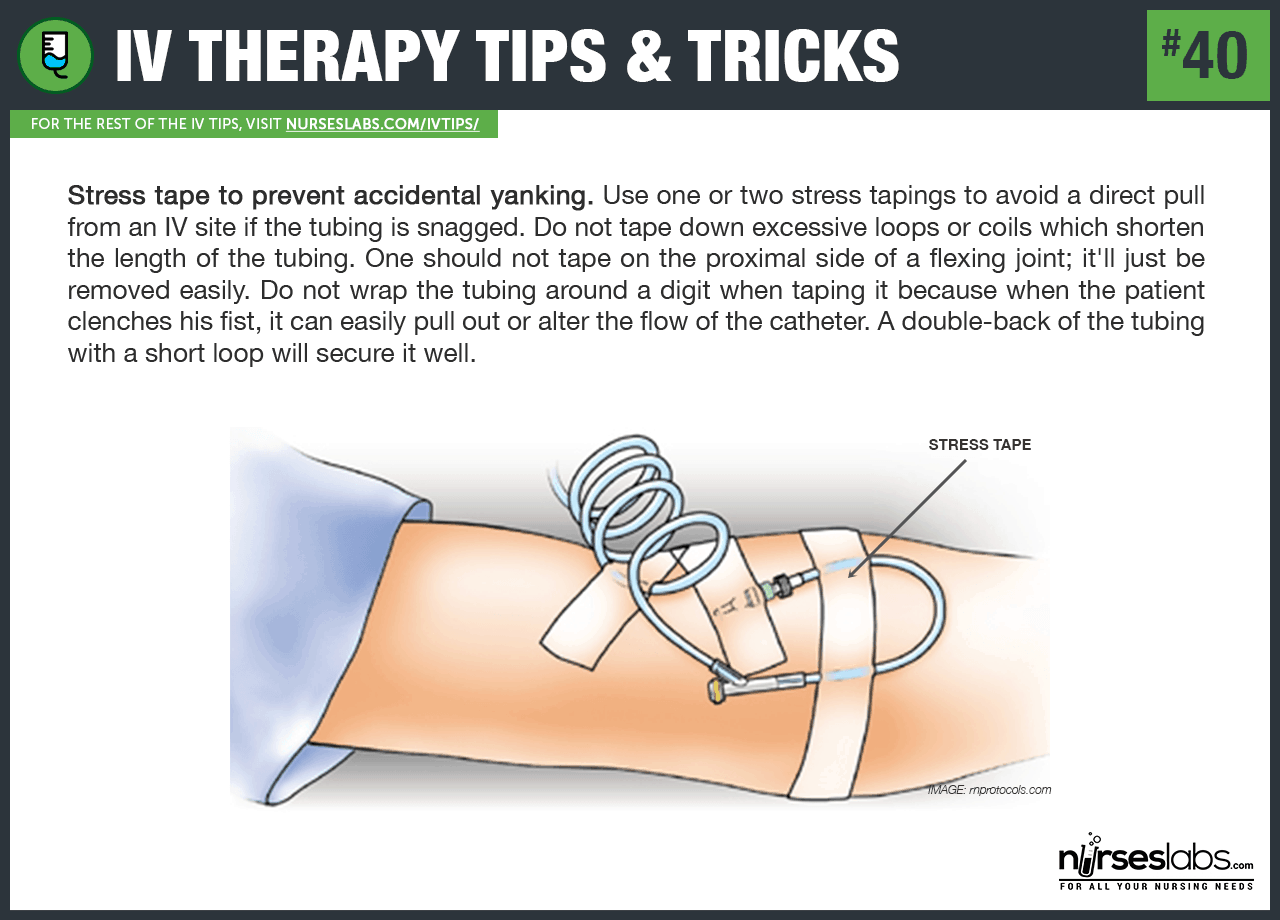
40. Stress record to preclude accidental yanking. Use one or ii stress tapings to avoid a direct pull from an IV site if the tubing is snagged. Practise not tape down excessive loops or coils which shorten the length of the tubing. One should not tape on the proximal side of a flexing joint; it'll just be removed easily. Do not wrap the tubing around a digit when taping it because when the patient clenches his fist, information technology tin can easily pull out or alter the flow of the catheter. A double-back of the tubing with a short loop will secure information technology well.
41. If it leaks.If a small leak occurs at the bespeak and moment of insertion, the vein may notwithstanding be usable if the catheter tip can be fully avant-garde proximal to the leakage. Observe a exam infusion of non-irritating fluid for any extravasation carefully earlier another use.
42. Do non probe for a vein. Also called "fishing" or "vein searching"–this is painful peculiarly when the nurse unintendedly probes into musculus or tendon. If you lot don't get a flashback, don't let your needle dig for a vein by moving it around. When this does happen, this may be a sign that you lot've missed your target, and your needle has been deflected past a rolling or difficult veins. Sometimes, yous may simply demand to pull back the needle and insert in some other direction, doing so is improve than starting the procedure over once more.
IV Therapy Tips and Special Considerations
Not all veins are the same, different people with different conditions have dissimilar veins, then here are some special IV therapy tips and considerations yous demand to note.
43. For older patients and pediatric patients. They accept smaller and fragile veins than normal adults do. Use small gauges that can however assist proper venous flow. Choose the right site for insertion. Probably the safest location is in the hands, but be sure to stabilize it because pediatric patients are fond of gesticulating, and elderly patients are prone to falls.

44. For patients who take a nighttime skin tone. You can use a blood force per unit area cuff and inflate it to visualize the vein more than clearly due to distention. The trick of wiping a cotton swab in the direction of the vein besides helps to visualize the vein better for pediatric, elderly, and nighttime-skinned patients.
45. For veins with valves, employ the floating technique. There are some people with prominent valves in their veins that can hinder insertion. These valves feel like piffling bumps along the vein's track and are common amidst weightlifters and sculptors. If you have difficulty inserting the catheter to this kind of vein, apply a floating technique to open up the valves. Floating method is washed past attaching a primed extension tubing to the cannula and gently flushing the tubing with normal saline via a syringe while advancing the catheter.
46. Bifurcating veins. These veins have a noticeable inverted V-shape and are less likely to roll during insertion. However, the vein should be accessed beneath the bifurcation with the highest probability of cannulation success.
47. Call the "vein whisperer". After some reasonable unsuccessful attempts to insert the IV catheter, information technology would be all-time for the patient that the nurse calls for another healthcare provider to effort inserting the IV. Staff in NICU, Anesthesia, or vascular surgeons are sometimes needed for some patients. Phone call on those who may have the best chance before all veins are used upwards.
48. On the use of restraints. Infant and children may demand to have their limb splinted or restrained earlier starting the Four as they may be uncooperative during the insertion. Do non forget to identify your tourniquet earlier securing the splint as non to have to delve it through beginning the venipuncture.
49. Restraining using Papoose or Mummy wrap. It can be wise to restrain using a "Papoose" or a "Mummy" wrap for some children whom agitation and potential combativeness cannot yet be safely relieved. Though unsettling to the family, explain that yous want to brand the all-time possible chances of success in the kickoff attempt.
l. Learn the fine art of distraction. Children tin be uncooperative during procedures and use of distraction methods similar letting the patient blow bubbling, sing or count are sufficient techniques.
51. Starting an intraosseous line. During an emergency, the best way to deliver drugs and fluids to a critically sick kid (if y'all can't outset an IV line) is by using an intraosseous line. An intraosseous line goes directly into the os marrow cavity, an fantabulous point of entry for fluids, blood products, and drugs. The bone marrow also serves every bit a not-collapsible vein, thus fluid infused into the marrow crenel enters the apportionment via a network of venous sinusoids.
52. Detecting infiltration in a patient who's obese or has edema. Compare the limb'south skin turgor and size with the contrary extremity and meticulously inspect the site for swelling, coolness, blanching, discoloration, and leakage at the needle's insertion point. If you're all the same unsure, place a tourniquet proximal to the venipuncture site and get in tight enough to restrict venous flow. If the infusion continues without assist from a mechanical pump device, you lot've confirmed infiltration.
53. Evaluate for infiltration. Occlude the vein proximal to the Iv site, if the IV fluid continues to flow, the cannula is probably outside the vein; if the Iv flow stops after the occlusion of the vein, the device is yet in the vein.
54. Check for patency. You tin also check for patency by lowering the 4 fluid container below the IV site and monitor the advent or backflow of claret in the IV tubing. If blood appears, the Four device is nonetheless in the vein.
55. In case of infiltration. Remove the IV device immediately and elevate the extremity. Application of warm or cold compress over the affected area also helps. Restart the 4 device in the contrary extremity.
Starting an Iv to Pediatric Patients
Starting an Iv to a pediatric patient is extra challenging as their veins are smaller and are sometimes distressed when they meet a needle. Hopefully, these Iv tips for pediatric patients can help you lot:


56. Keep calm and calm the child. When starting an Four on an baby, try soothing them beforehand with a pacifier. If mom wants to hold the babe, as if canteen/breastfeeding is okay while starting the line.
57. Insert on nondominant manus. Hand veins in the nondominant hand are preferable for modest children of walking historic period and infants.
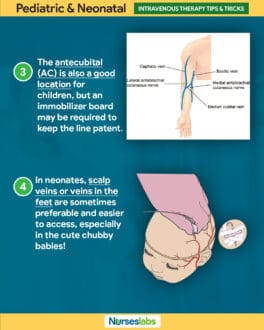
58. Use an immobilizer. The antecubital (Air-conditioning) is also a good location for children, but an immobilizer board may be required to keep the line patent.
59. Scalp veins. In neonates, scalp veins or veins in the anxiety are sometimes preferable and easier to access, especially in the cute chubby babies!
threescore. Accelerate on flashback. With preemies and small newborns, try advancing the catheter instead of the needle after the initial flashback of blood. Babies veins aren't mature yet, and y'all may accident a vein past advancing the needle.
61. It's a TB peel examination. One nurse told me, "think of it like a TB skin test." Stick almost flush with the skin when sticking neonates and newborns. Many times, their veins are close to the skin's surface.
62. Less hurting. Utilise anesthetic creams or sprays for children.
63. Know your nursery rhymes. When starting an IV on a toddler (ages 1-three), effort singing, pacifiers or musical toys as a means of distraction. Hint: Itsy Bitsy Spider works wonders for my son and other kids, too, especially when accompanied with hand motions! Give it a shot.
64. Communicate. With young children ages 4 and up, just exist honest with them. Kids tin can comprehend more than than yous may recollect and, therefore, can see reason. Tell them that the procedure volition hurt, but simply for a minute. Assure them that they will non lose all of their blood. It also wouldn't hurt to "bribe" the kid to hold still with stickers, toys, etc.
65. Avoid tourniquets if you can. Utilise traction with your hands and utilize coworkers when available. The employ of tourniquets increases your gamble of blowing veins on children.
66. Dangle that arm. Having the patient dangle their arm off of the side of the bed or let it hang by their side prior to sticking will increasing blood flow to that extremity. Veins volition be easier to experience and run into.
67. Know when to stop. It'southward not expert patient care to repeatedly stick them 4 or v times blindly. Find someone else with more than experience to try. Everyone had bad days.
Additional Tips
68. Use firm traction. All veins roll. Some roll worse than others, especially in older people with thin pare. Holding traction is a must. Otherwise, you will exist earthworks and chasing that vein all over. Not only does this hurt the patient, but yous also have a risk of stabbing through the vein. Hold house traction at the top and bottom of your insertion site using your non-dominant hand before attempting the start.
69. Don't simply apply your eyes, feel. Sometimes, the juiciest veins are the one you tin can't run across. If you depend solely on your eyesight for IV starting, y'all will miss out on a lot of good options. Practice feeling veins that you CAN see, noting the deviation betwixt veins and muscle/flesh. Earlier long, you will exist sticking with your optics closed. Well, maybe don't close your eyes. But you lot get the idea.
seventy. Use a tourniquet, or don't. Sometimes, using a tourniquet is a bad thought. If you lot can feel that information technology is a large vein, and can even meet it, skip the tourniquet. Tying the tourniquet as well tight tin can crusade the vein to accident when it's punctured. If you blow a vein using a tourniquet, try starting an admission without it.
71. Use an appropriate-sized needle. I know we all want that large 18g access for our patients. But information technology's non e'er advisable. Using a needle that is too large can blow the vein. Apply the biggest access that you can. Simply realize that, sometimes, a 22g may be all you can do.
72. Don't permit unsuccessful attempts haunt you. We all miss veins. It happens. Whether information technology's a faulty method or just a bad vein, no one is successful 100% of the time. Let the losses go. Be confident with the next attempt. If given the opportunity, try every IV you can. The more you try, the more skilled you will be.
Source: https://nurseslabs.com/how-to-start-an-iv-insertion-tips/
Post a Comment for "How to Open Upload Rainforest Infusions Bottle"